Office 365 install without activating

If you need to install Office 365 on a user’s laptop but not activate it (because you can only do it five times yourself), read on…

Get the deployment tool (link for Office 365 2016)

https://www.microsoft.com/en-us/download/details.aspx?id=49117

Run the executable – this will extract the setup.exe and configuration.xml files. Put these in a handy directory.

The default configuration.xml should be ok for downloading the installation sources (32-bit Office and Visio). Run setup.exe /download – this will download the office sources to a subdirectory Office\Data (there’s about 1.25 Gb of files). Note there is no progress indicator!

To install, edit the configuration.xml file to uncomment and change the Display option as follows;

<Display Level="None" AcceptEULA="FALSE" />

Run the setup tool again to install:

setup.exe /configure

(If no other options are given it will use the configuration.xml in the same directory and the install data sources in the Office\Data subdirectory).

Note: no progress is shown, except for the setup program eventually exiting.

This should result in a default install of Office and Visio, ready to be activated on first run.

If you are doing this for a system image, do not run any of the Office programs! Even if you cancel the activation dialog and exit, it still generates a unique ID for the install that you probably don’t want to clone.

To see the various other things the tool can do see the documentation linked from the download page. (One interesting thing – you apparently can install a version that allows multiple people on a system to use Office without it counting against their 5-system limit, such as on a terminal server. In this case we’d probably use the Office 2016 install activated against the KMS server, but someone might find this useful).
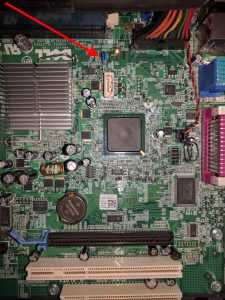
Reset BIOS Admin password on Optiplex 780 SFF

To reset BIOS passwords on Optiplex 780 (small form factor shown here);

  1. Power off system and remove jumper (normally blue) from PSWD1
  2. Boot system – BIOS should alert about password disabled.
  3. Power down and replace jumper
  4. Password should now be cleared – check in BIOS settings.
Dell Optiplex 780 Small Form Factor BIOS password reset jumper.

Seagate DiscWizard insisting on reboots

Sometimes Seagate DiscWizard insists on rebooting, even if you’re cloning between two non-system drives. It is worth checking the state of the target drive. I found that even with no partitions, a target drive with a GPT partition table caused this issue. Solved by firing up diskpart:

list disk
select disk {number}
clean

This wipes the partition table (and consequently the disk appears in the Disk Management console as not initialized). DiscWizard should then clone to it without complaints.

Accessing additional Exchange mailboxes using IMAP

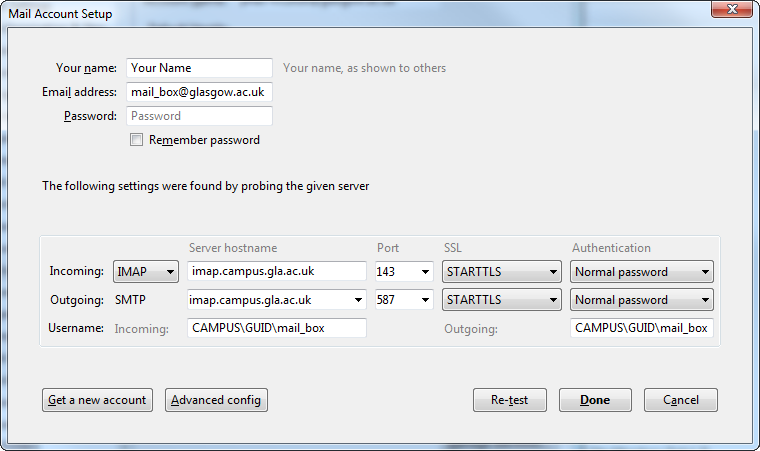
If you are using Outlook it’s reasonably straightforward to access additional mailboxes on your Exchange mailserver. Using other clients it’s a bit more obscure. The Glasgow Exchange server can be accessed via IMAP (although it’s best to use the native exchange protocols when you can). To access a mailbox called mail_box use these settings (using Thunderbird as an example):

Thunderbird_alternate_mailbox_settings

Note that when using an Apple or Android phone, you can access your primary mailbox using the Exchange protocol (and it’s recommended to do so). However, this is a reduced functionality mobile version which does not give access to additional mailboxes. For these, you have to use an IMAP connection (i.e. set up an additional mail account and use the settings above).

Volume licenced Office 2016 Repeated Activation Prompts

Had a situation that seems to be fairly common – get laptop, uninstall “Get Office” program, install Office 2016 and activate using KMS server, which seems to work fine. Then when you fire up one of the programs you get the “Lets get started” screen. You can close this and it works ok, but it is annoying.

To fix this see https://support.microsoft.com/en-us/kb/3170450 (deleting a couple of registry keys that make Office think it’s still in OEM mode).

HKEY_LOCAL_MACHINE\SOFTWARE\Wow6432Node\Microsoft\Office\16.0\Common\OEM

HKEY_LOCAL_MACHINE\SOFTWARE\Microsoft\Office\16.0\Common\OEM

Installing Jekyll on Debian 8 (Jessie)

Install ruby-full:

sudo apt-get install ruby-full

Install ruby-ffi

apt-get install ruby-ffi

Install Jekyll

gem install --http-proxy http://wwwcache.gla.ac.uk:8080 jekyll

install node.js

apt-get install nodejs

Should then work for normal user.

Quick test – (from https://www.digitalocean.com/community/tutorials/how-to-deploy-jekyll-blogs-with-git)

jekyll new awesomeblog

This will create an awesomeblog directory containing the configuration files, posts directory and other required bits.

cd awesomeblog
jekyll serve

Jekyll will build your blog, and after a few seconds you should be able to visit http://host:4000 in your browser. Or skip the serve bit and check in the _site subdirectory.

To get git working with this create the git repository, go into the hooks subdirectory and create a post-receive script like this (again from https://www.digitalocean.com/community/tutorials/how-to-deploy-jekyll-blogs-with-git)

#!/bin/bash -l
GIT_REPO=$HOME/repos/awesomeblog.git
TMP_GIT_CLONE=$HOME/tmp/git/awesomeblog
PUBLIC_WWW=/var/www/awesomeblog

git clone $GIT_REPO $TMP_GIT_CLONE
jekyll build --source $TMP_GIT_CLONE --destination $PUBLIC_WWW
rm -Rf $TMP_GIT_CLONE
exit

or /var/www/html/awesomeblog for apache on Debian 8.

Raspberry Pi networking notes for connecting directly to laptop

If running normal raspbian edit the file /etc/network/interfaces to add in two blocks:

iface eth0 inet dhcp

and

iface eth0 inet static
    address 169.254.210.230
    netmask 255.255.0.0

Comment out the block not in use. For networks that have a dhcp server running use the first block, for connecting to a Windows computer via a private network use the second (If Windows connects to a network, is set to obtain an address automatically and can’t get one then it self-assigns a 169.254.x.y address). Static address can be anything of the form 169.254.x.y.

Full example file:

# For static IP, consult /etc/dhcpcd.conf and 'man dhcpcd.conf'

# Include files from /etc/network/interfaces.d:
source-directory /etc/network/interfaces.d

auto lo
iface lo inet loopback

auto eth0
allow-hotplug eth0

# Comment out this block when connected to laptop
#iface eth0 inet dhcp

# Comment out this block when connected to building network (or any network with dhcp)
iface eth0 inet static
   address 169.254.210.230
   netmask 255.255.0.0


allow-hotplug wlan0
iface wlan0 inet manual
wpa-conf /etc/wpa_supplicant/wpa_supplicant.conf

allow-hotplug wlan1
iface wlan1 inet manual
wpa-conf /etc/wpa_supplicant/wpa_supplicant.conf

Installing MATLAB 2015b on Debian Jessie

Ran into a couple of problems here:

Default Debian behaviour is to mount cd’s with noexec option. Thus you get permission denied even as root when you try to run the install script. Solution; remount cd:

sudo mount -o remount,exec,ro /media/cdrom0

or whatever path the cd is mounted at. You need the ro otherwise it complains.

Other more general problem: sudo ./install just results in Installing... Finished and a silent fail. In the old days using gksudo fixed this but apparently it’s deprecated now. It does work when running as normal user, so tried:

sudo -E ./install

this worked correctly.

Talysurf in upper JIF lab

The Talysurf software on the laptop in the upper JIF lab sometimes fails to find it’s licence. This is usually because it only checks the license against the first network interface it finds, which is often the WiFi interface (the license is locked to the cabled ethernet interface).

The solution is to disable the wireless interface in the network interfaces window.